
About the Neapolitan Mandolin
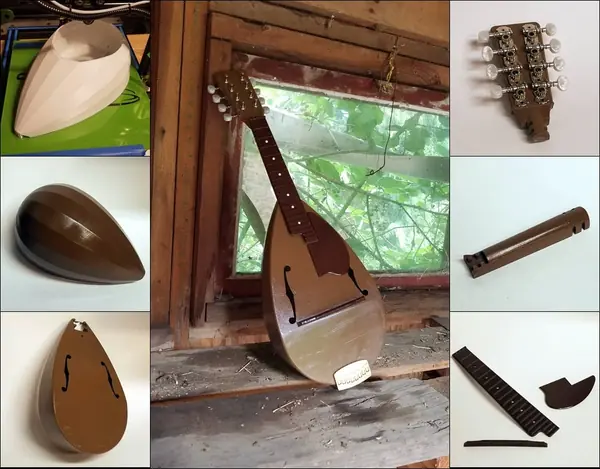
A full-scale Neapolitan (bowl-back) mandolin based on a wooden instrument's dimensions. The designer gives it a single sound hole, which is typical of Neapolitan mandolins. He's very clear about the risk. Eight strings at over 5 kg each put more than 40 kg on the instrument 'trying day and night to implode the device'. He makes no safety guarantee, and says it's not a beginner project. You need a printer that handles big overhangs well.
His final verdict is that PLA is the wrong plastic. Tuning up bent the neck toward the soundboard and left a big gap between the strings and frets, which a stiffer material might avoid. Print in the supplied orientation, with supports touching the bed only and 4 walls. Use 0.2 mm layers on the bowl so you can cut out the holes. The tight joints need a rasp and sandpaper. You'll also need tuning machines, loop-end mandolin strings and E6000 or superglue. The video, linked from the designer's page, shows it played.
Who it's for. Experienced makers with a large-format printer who are curious about bowl-back construction and happy to experiment with stiffer materials. Read the designer's warnings first; he's clear that he can't vouch for its strength.
What you'll need
Printed parts
- Bowl
- Neck, soundboard and other parts
Bought parts
- Mandolin tuning machines
- Loop-end mandolin strings
- E6000 or superglue
Tools
- Rasp and sandpaper
Build overview
Our own outline of the designer's tips on Thingiverse. Read his safety note before you start.
- Check your printer. You need at least 300 × 300 mm. The designer won't split the bowl for smaller printers.
- Print it strong. Keep the supplied orientation, use 4 walls, and add supports only where they touch the build plate. Choose a stiffer plastic than PLA if you can.
- Print the bowl at 0.2 mm. That lets you cut out the sound hole and the fretboard peg hole afterwards. Allow about 30 hours for the bowl alone.
- Fit the joints. They're tight on purpose; work them with a rasp and sandpaper until they go together.
- Glue up. Assemble with E6000 or superglue.
- String it carefully. Fit the tuning machines and loop-end mandolin strings and bring them up slowly. Watch for the neck bending toward the soundboard, which is what happened with the designer's PLA build.
Print settings
- Printer: 300 × 300 mm or larger
- Supports: Touching the build plate only
- Bowl: 0.2 mm layers
- Walls: 4
- Material: Stiffer than PLA recommended
Video
 Play video: 3D-printed mandolin (loads YouTube)
Nothing loads from YouTube until you press play. Video thumbnails are © their creators.
Photos
Thingiverse doesn't let us fetch its gallery, so the photos stay on Thingiverse. See them on Thingiverse ↗